Understanding Tokens in LLMs

Photo by Egor Komarov on Unsplash
The word token comes up all the time these days, especially if you use AI in your daily work. But a lot of us don’t really know what a token actually is. What are tokens used for when an AI processes our prompt? And behind all that AI magic, how are tokens counted, and why do we keep running into those “you’ve reached your limit” warnings?
Those questions are exactly why this article exists. Let’s go through them one by one. Hopefully you’ll pick up something new along the way and become a bit more aware of what’s going on when you use AI.
What is a token?
A token is a piece of text that a model (LLM) uses as its unit of processing. A token can be a single character, part of a word, a whole word, a piece of code, or a punctuation mark. Even whitespace can affect how tokens are formed.
So right away we can tell that a token isn’t always one word, which means the number of tokens isn’t the same as the number of words. Even the exact same text can produce different tokens, depending on the tokenizer the model uses.
Tokenizer, Vocabulary, and Token IDs
In this section we’ll look at what happens when our prompt is sent to an AI model. The first step is turning the human-readable words we wrote into tokens using a tokenizer. A tokenizer is the component responsible for breaking text into tokens so the LLM can process them.
How does it work? To try it out, we can use the tokenizer playground from Hugging Face: The Tokenizer Playground. For this experiment I picked the GPT-4 tokenizer, and here’s the result:
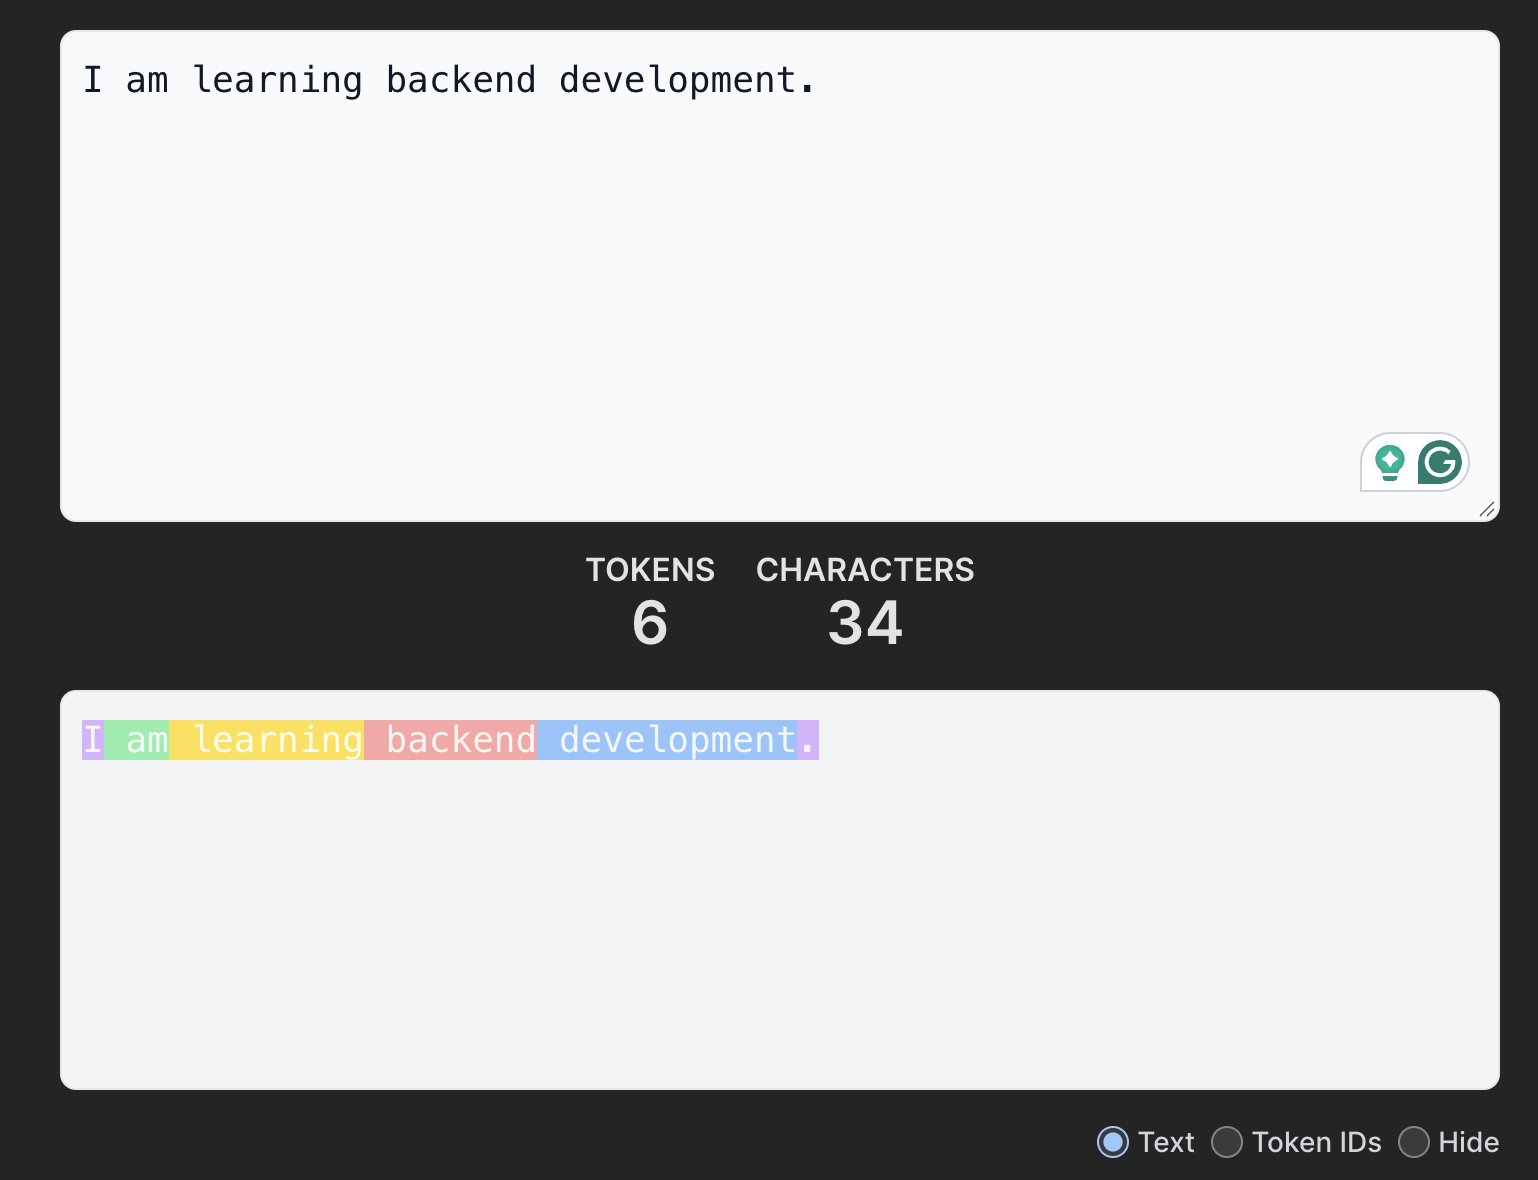
In the image above you can see the text has been split into several pieces. Once it’s split, each token gets its own identifying number. That number is called a Token ID.
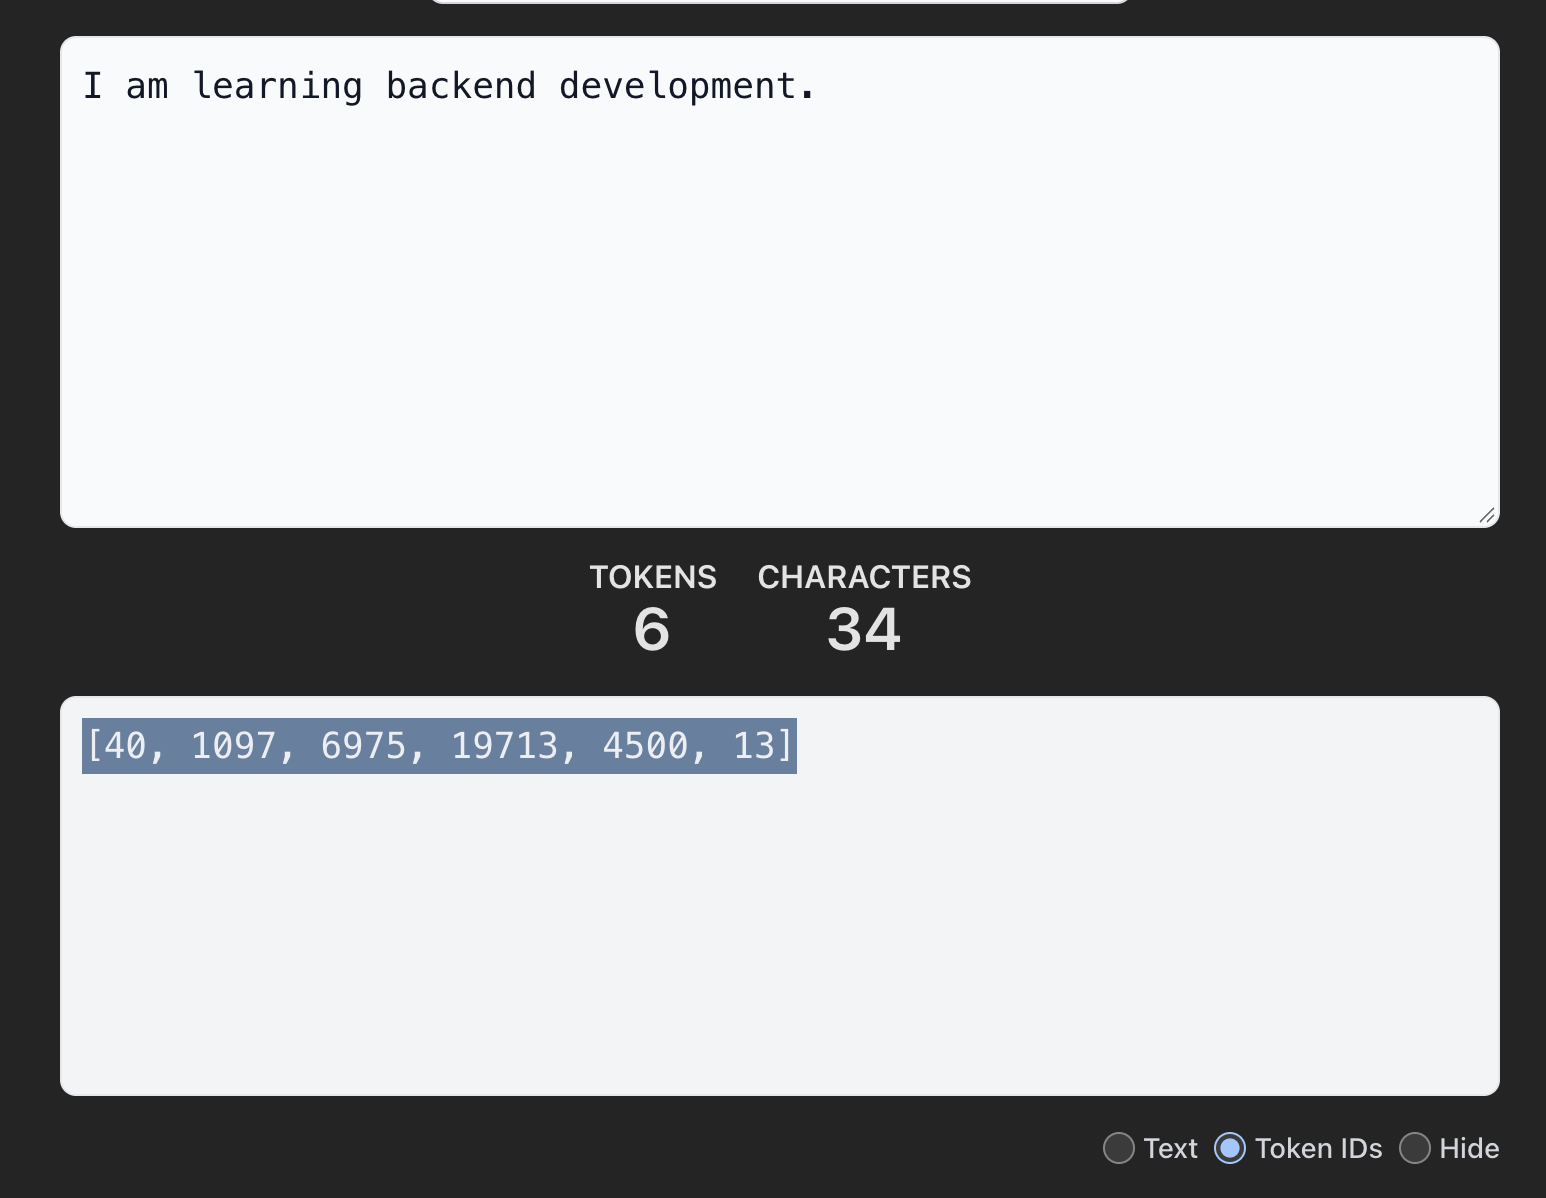
As you can see, the tokenizer has converted the tokens into Token IDs. Here’s the result:
| Token | Token ID |
|---|---|
I | 40 |
␣am | 1097 |
␣learning | 6975 |
␣backend | 19713 |
␣development | 4500 |
. | 13 |
Notice the ␣ in front of some tokens. It means the space is part of the token itself, so ␣am and am are two different tokens.
You might be wondering where these Token IDs come from, and how the tokenizer knows that token x has Token ID y. The answer is the vocabulary: the set of tokens the tokenizer knows, each with its own ID. The vocabulary is built from training data. Chunks of text that show up often become a single token, while rarer words get split into smaller pieces.
Keep in mind, every tokenizer can have its own vocabulary and its own rules for splitting text, even across model generations from the same provider. So even if you send the exact same text, the tokens and Token IDs you get back aren’t guaranteed to be the same.
Here’s a simple analogy to tie these three pieces together. Imagine a catalog full of text fragments, where every fragment already has its own ID number. That catalog is the vocabulary. The tokenizer’s job is to cut our text into pieces, then look up each piece in the catalog to get its number, which is the Token ID.
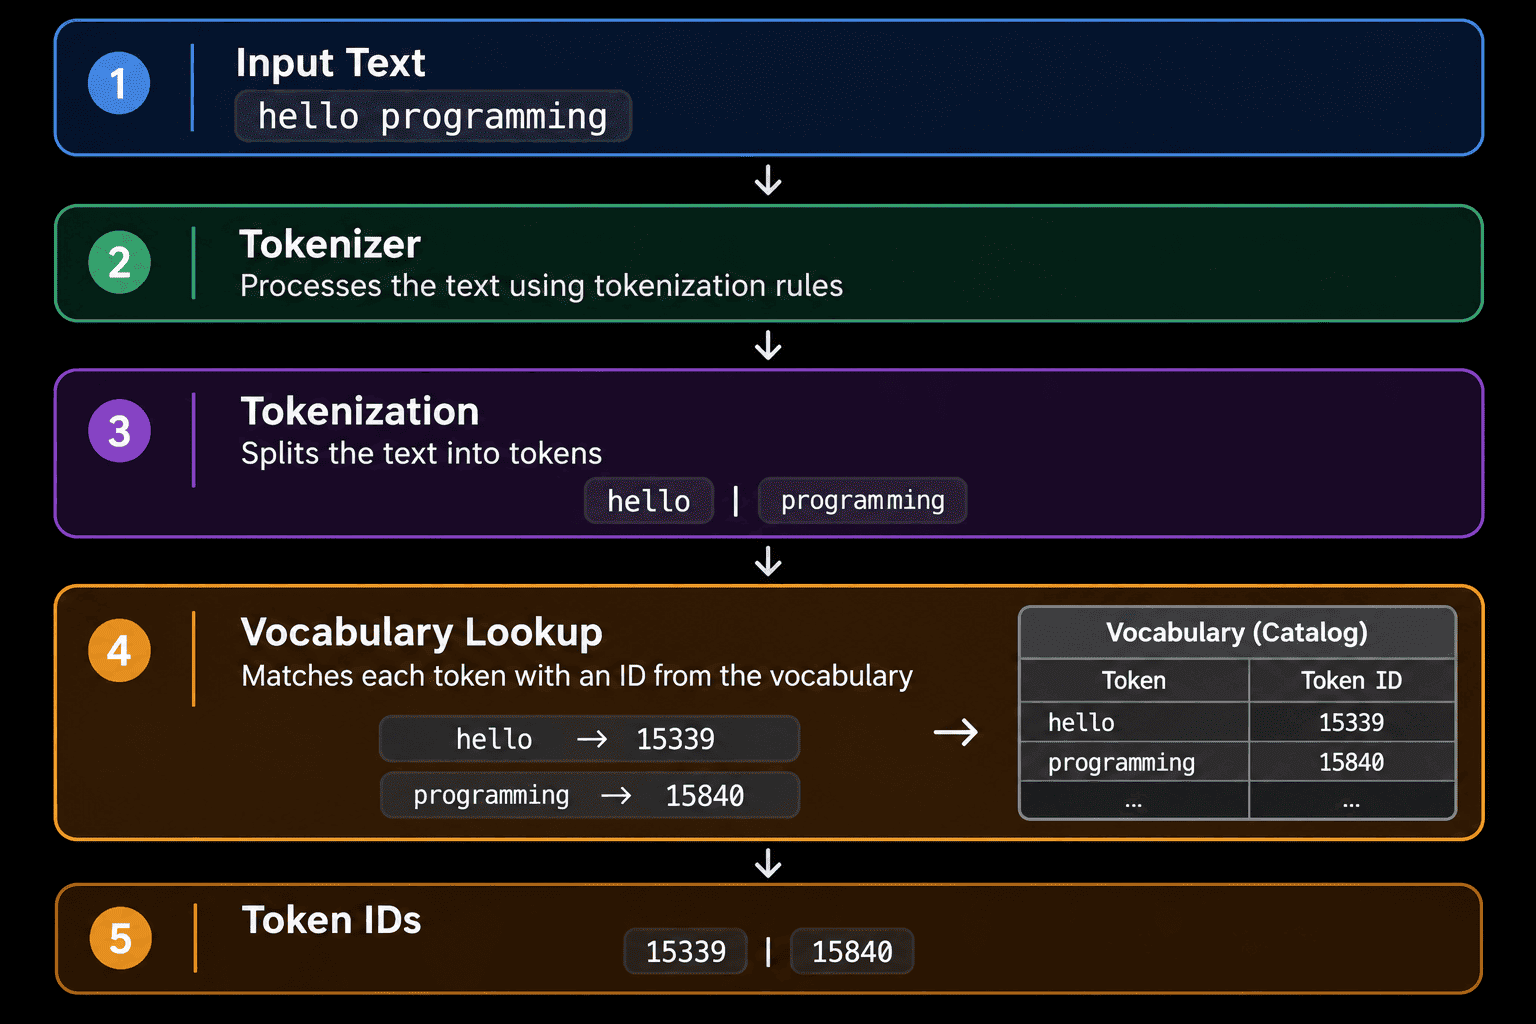
This is a simplified conceptual picture, not an internal order that every tokenizer has to follow.
Make sense?
Why do word, character, and token counts differ?
Let’s run another experiment, this time with OpenAI’s tokenizer: OpenAI Platform Tokenizer, using the GPT-5.x option. We’ll feed it the same sentence in English and in Indonesian, plus a small snippet of Go code. The goal is to compare the character count with the number of tokens produced. Let’s get started.
- Experiment A — English
I am a backend engineer.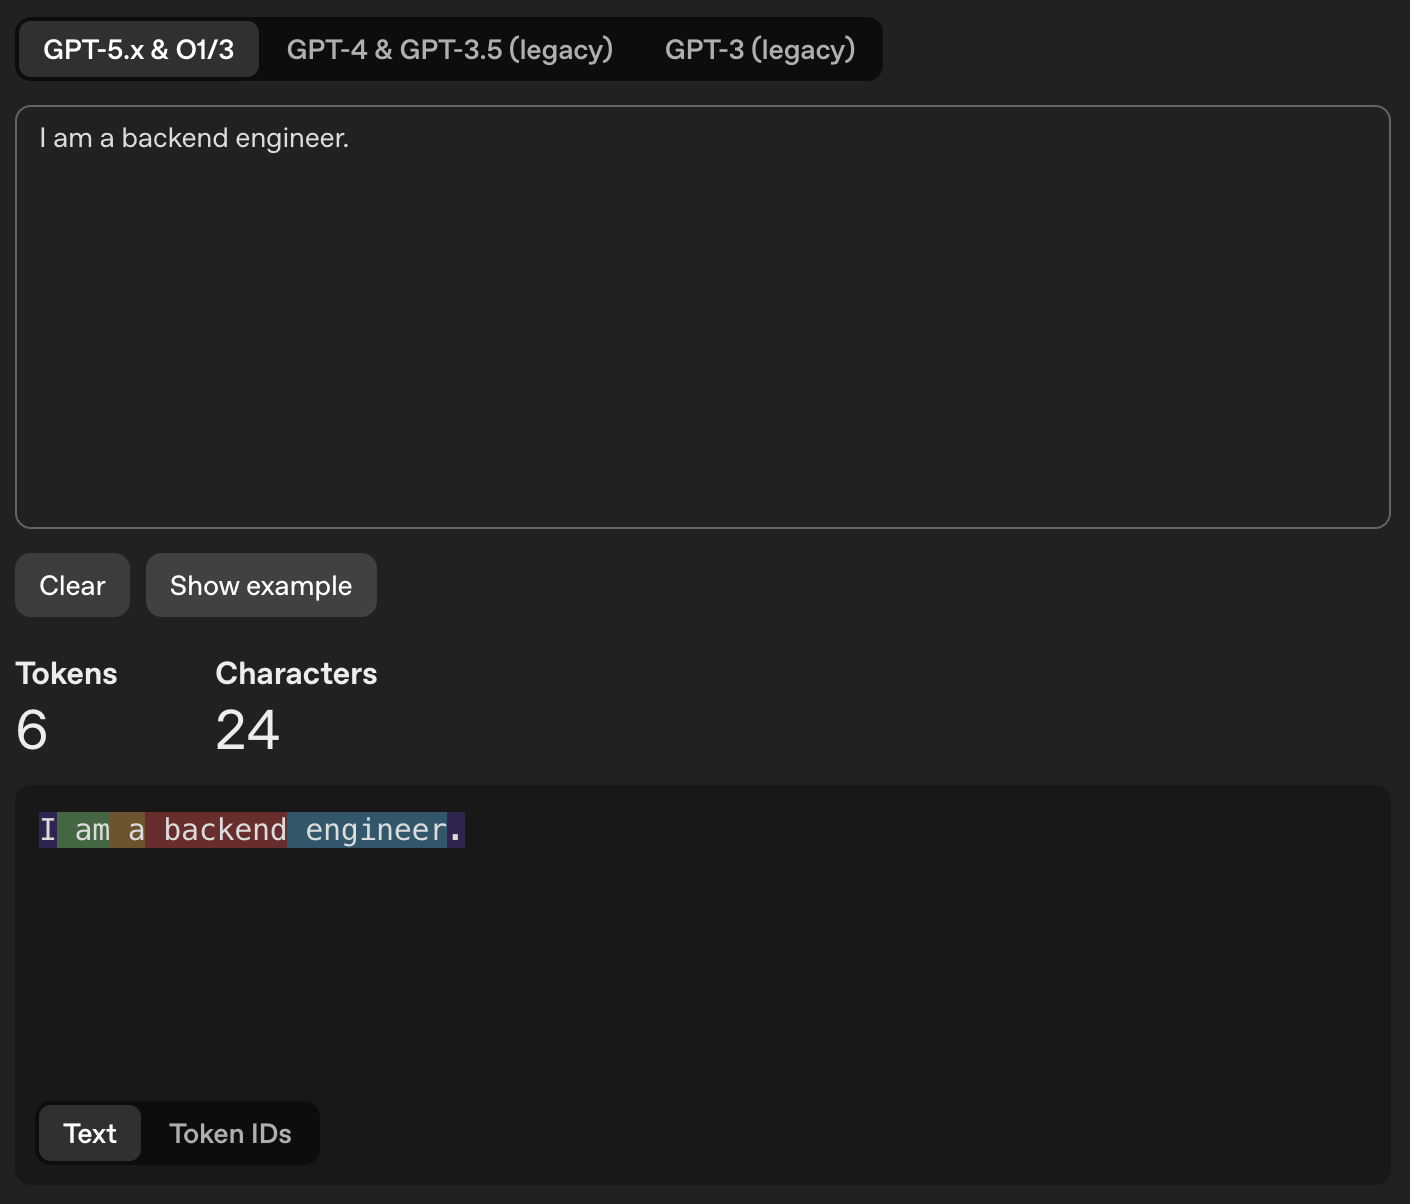
- Experiment B — Indonesian (same meaning as Experiment A)
Saya adalah seorang backend engineer.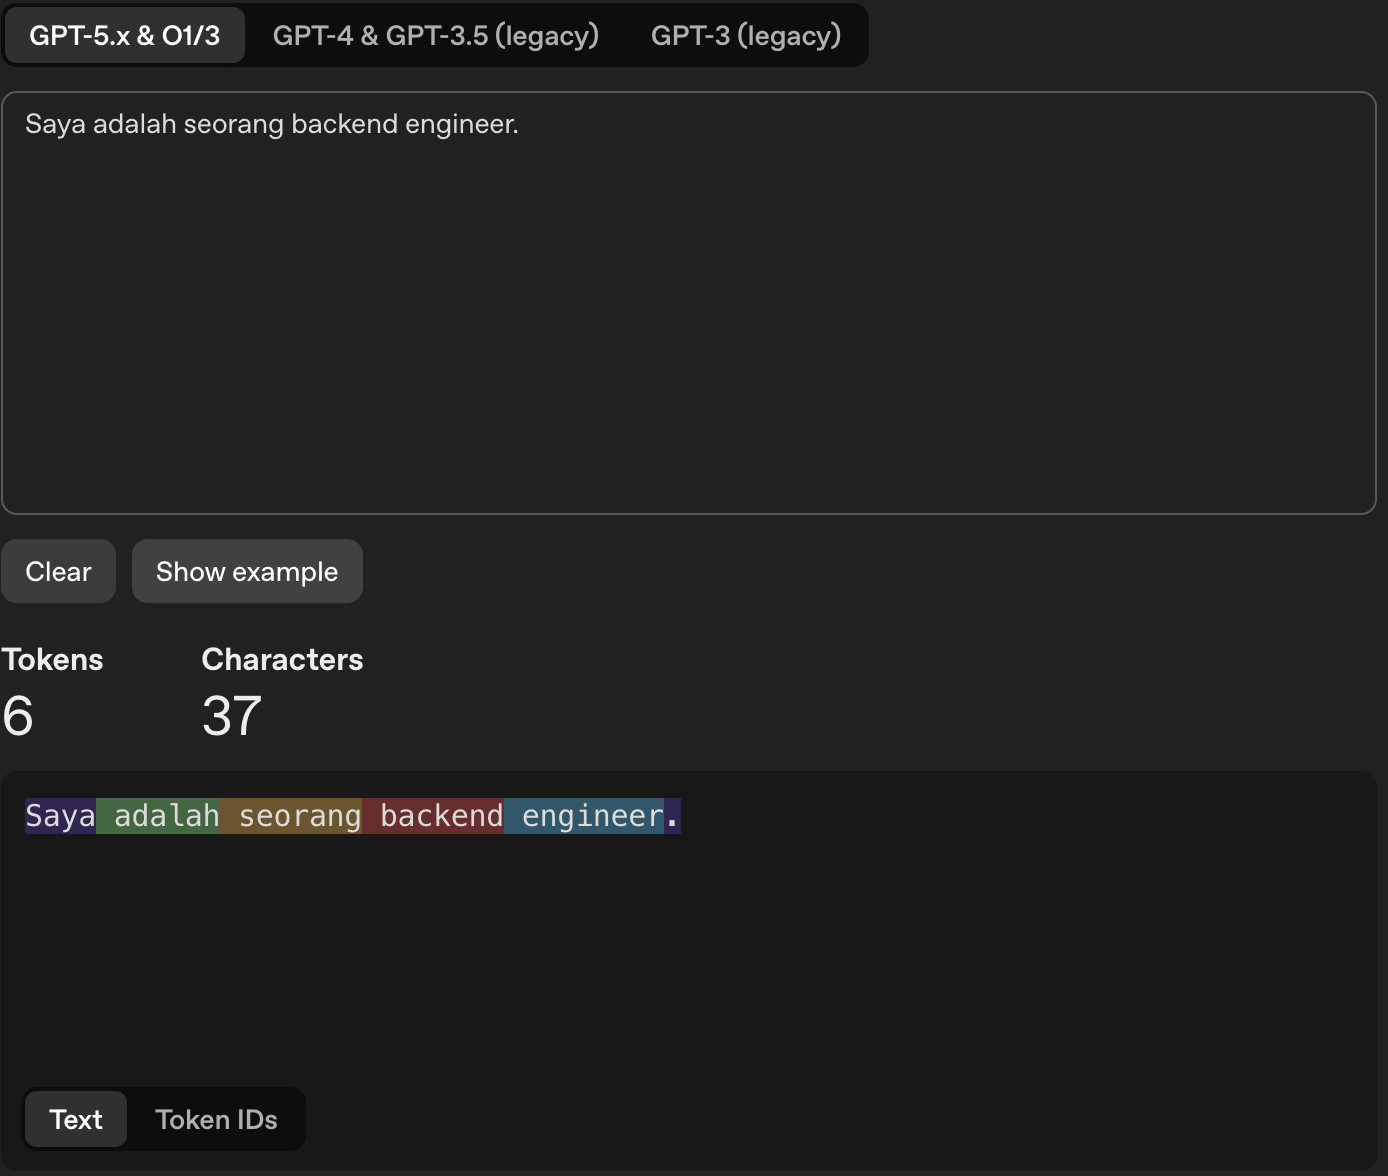
- Experiment C — Go code
func main() {
    fmt.Println("Hello World")
}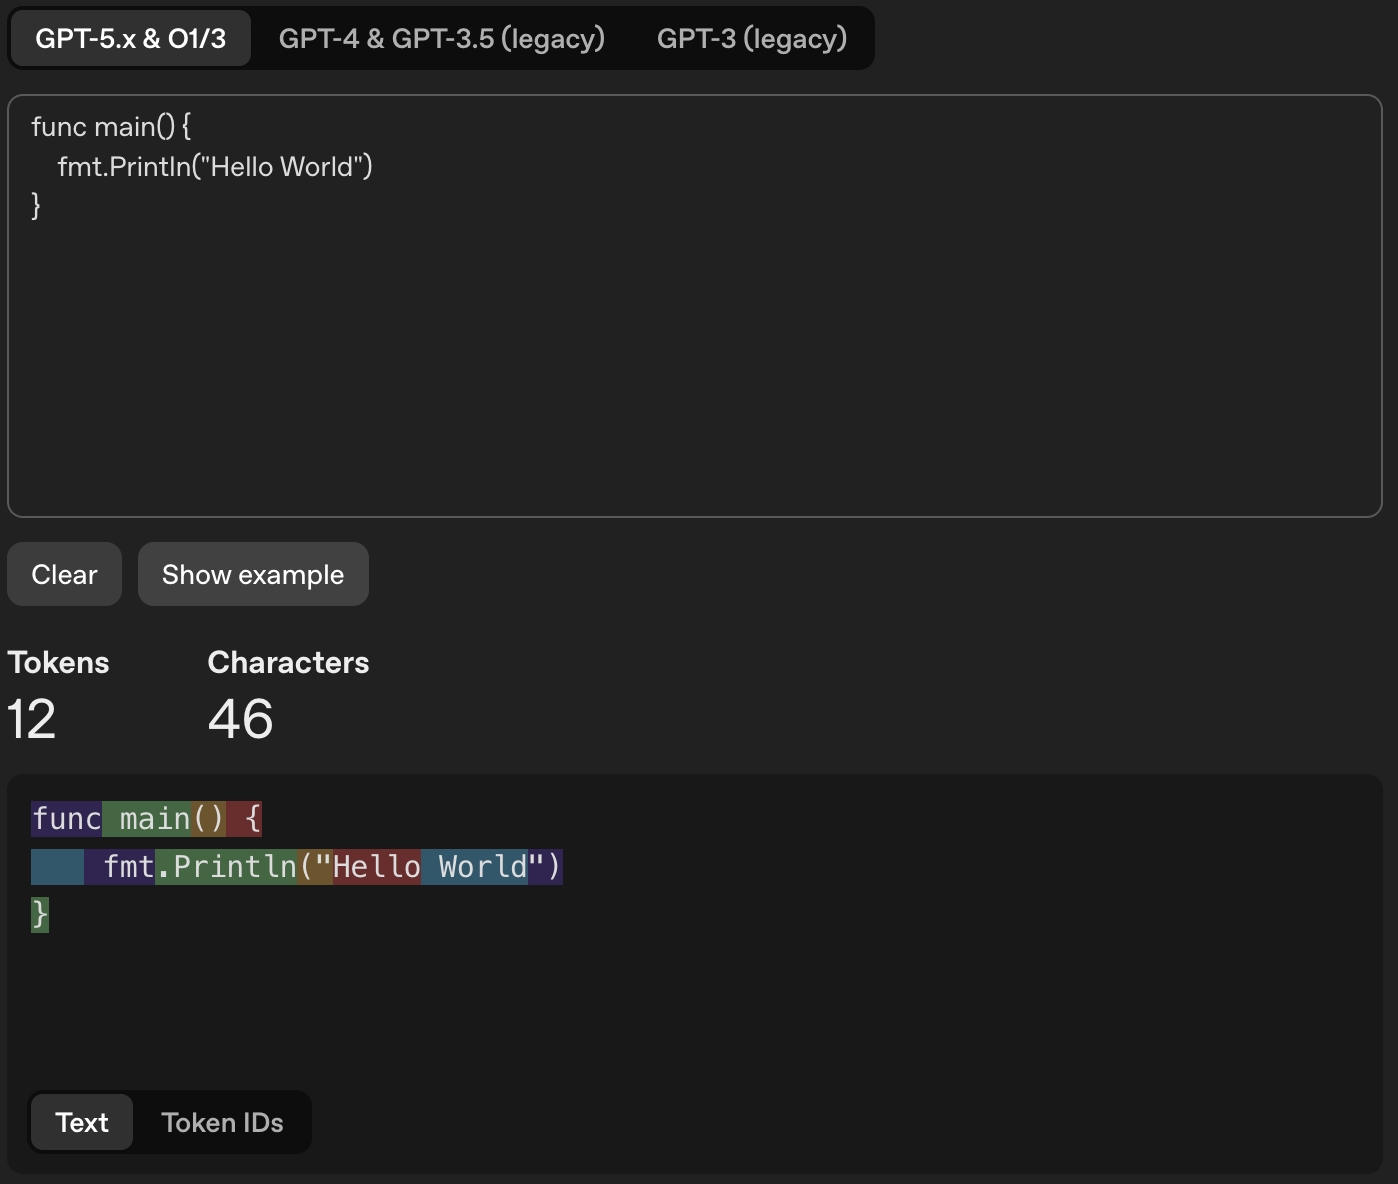
Here’s what we want to look at in the results above:
- How many tokens are produced?
- How does the tokenizer split the text?
- Does the token count match the number of words or lines of code?
And here’s what we recorded.
| Text | Characters | Tokens |
|---|---|---|
I am a backend engineer. | 24 | 6 |
Saya adalah seorang backend engineer. | 37 | 6 |
| Go code (Experiment C) | 46 | 12 |
These numbers apply to the tokenizer selected during the experiment. They’re not a universal rule for every model or provider.
So, let’s answer those three questions:
- Token count — the English and Indonesian sentences both produce 6 tokens, while the 3 lines of Go produce 12.
- How the text is split — in both sentences, each word becomes one token (with the leading space attached), plus one token for the period. The Go code gets split more finely: punctuation can be its own token or get merged with neighboring characters (like
.Printlnand("), and even the indentation at the start of the second line becomes its own token. - Tokens vs. words/lines — there’s no fixed relationship. The Indonesian sentence is 13 characters longer but has the same number of tokens, and 3 lines of code turn into 12 tokens.
The lesson here: longer text doesn’t automatically mean more tokens. What matters is whether those chunks of text already exist in the vocabulary. The Indonesian words adalah (“am/is”) and seorang (“a”, for a person) show up often enough in training data that the GPT-5.x tokenizer, with its large vocabulary, stores each of them as a single token. Older tokenizers with smaller vocabularies tend to split non-English words into more pieces. You can try this yourself by switching to the GPT-3 (legacy) tab on OpenAI’s tokenizer page.
But remember, these results don’t hold universally. In general, English text is still the most efficient. OpenAI’s rough rule of thumb[1] is that 1 token ≈ 4 characters, or about ¾ of a word, for English text, and non-English text often has a higher token-to-character ratio. Language, punctuation, code structure, and the tokenizer all need to be taken into account.
Input tokens and output tokens
When we send a prompt to an LLM, we’re charged for both input and output. As a Backend Engineer who works with APIs a lot, one question immediately popped into my head: “Why is output billed too? Isn’t the output just the finished result of whatever happened on the backend? You just send the response back, right?” Alright, let’s walk through what I understood after digging into it.
Input tokens are the tokens sent to the model. They’re not just the prompt you typed. They also include the system prompt, user instructions, conversation history, source code or documents, the definitions of available tools, and any tool results fed back into the context.
Output tokens are the tokens the model generates as its response, such as an answer, an explanation, generated code, or a request to run a tool.
Here’s a simplified view of the flow.
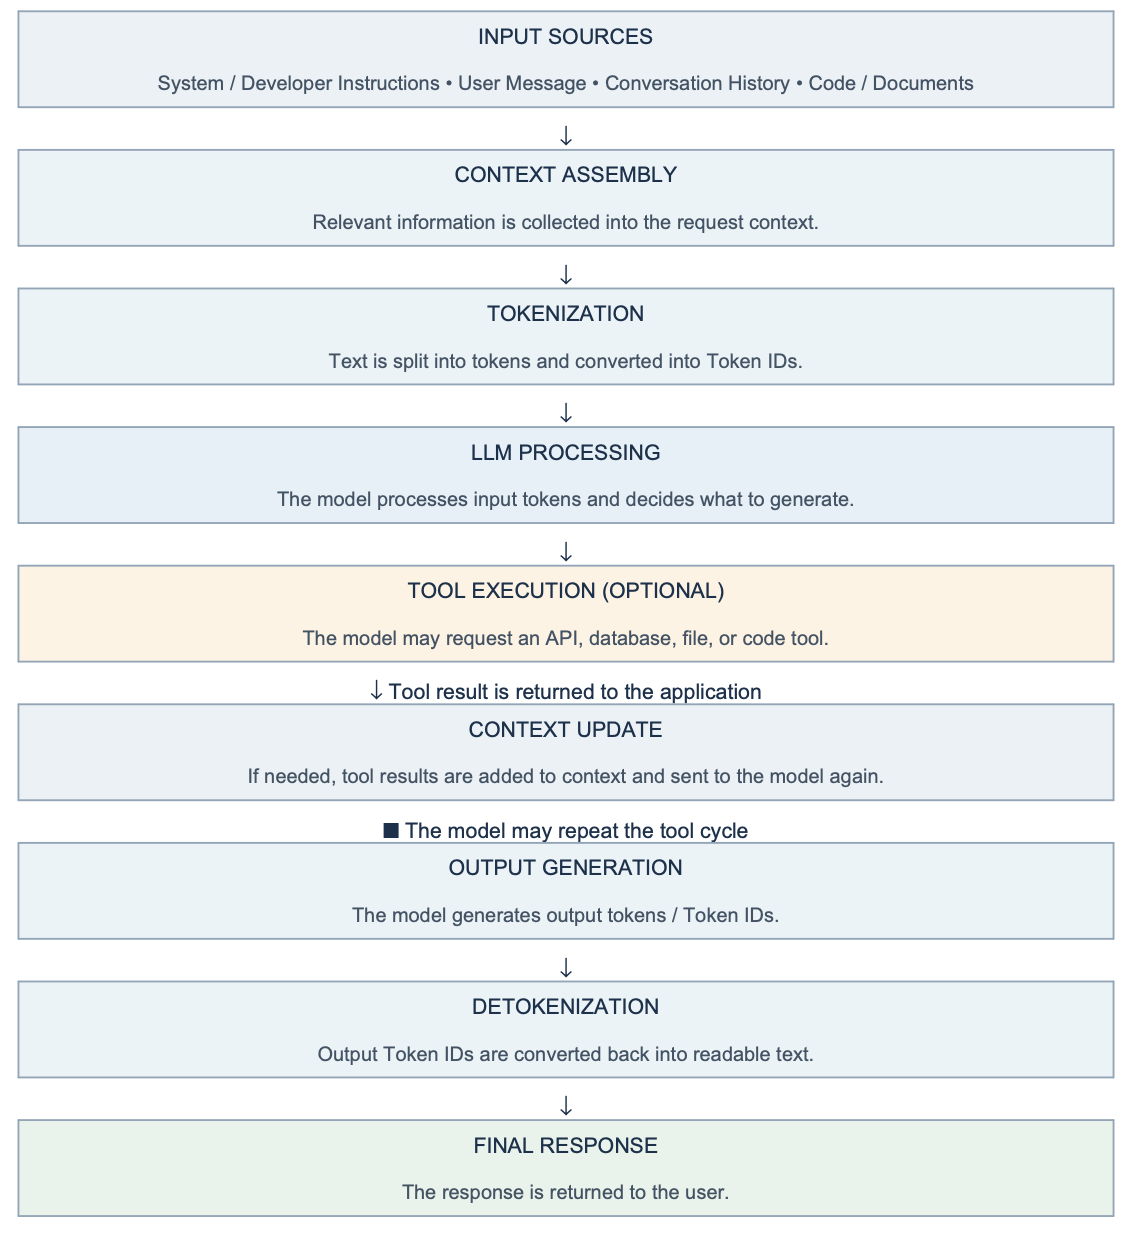
Let’s walk through the diagram:
- Input Sources — The model can receive application rules, the prompt we send, relevant conversation history, and code or documents. So the model’s input isn’t always just the latest message.
- Context Assembly — The application gathers the information it needs and assembles it into a context. Not all of the history has to be sent; it can pick only the relevant parts.
- Tokenization — The text is split into tokens, and those tokens are represented as numeric Token IDs for the model to process.
- LLM Processing — The model processes the incoming Token IDs and decides what to do next: either answer directly or ask the application to run a tool.
- Tool Execution (Optional) — This step isn’t required. The model doesn’t run tools itself. It only generates a request to call a tool (and that request also counts as output tokens), and the application is the one that actually runs it. Examples include querying a database, calling an API, reading a file, or executing code.
- Context Update — If the tool produces new information or data, the application adds it to the context and sends it back to the model as a new request. This can happen more than once until there’s enough information.
- Output Generation — Once there’s enough information, the model generates its output as Token IDs. The output can be a final answer or a follow-up instruction, depending on what’s going on.
- Detokenization — The generated Token IDs are converted back into human-readable text.
- Final Response — Finally, the response is sent back to the user.
So why does output cost money?
The answer lies in the Output Generation step. The output isn’t “already done, just send it back” like a typical API response. The model generates its answer one token at a time: each new token is chosen based on the entire input plus every output token generated so far. That means for every output token, the model has to do a full computation step, and the next token can’t be produced until the previous one is finished.
Input is different. All the input tokens are available from the start, so they can be processed all at once, in parallel. That’s why output tokens are usually priced much higher than input tokens.
One thing to note: reasoning models produce “thinking” tokens before the final answer. You don’t get to see these tokens in full (they’re hidden or only shown as a summary), but they’re still billed as output tokens[2].
This also shows that an LLM doesn’t always just take a message and immediately reply. What happens inside is of course more complicated than the diagram above, but at least we now have the big picture of how our instructions turn into an answer.
Why do we keep hitting limits?
Now we can answer the question from the beginning of the article. There are two kinds of limits we run into most often:
- Context window — the maximum number of tokens in a single request, covering both input and output. If the conversation history, documents, and the model’s response go over this limit, part of the context has to be trimmed or the request gets rejected.
- Usage limit / rate limit — a cap on tokens or requests within a period of time, such as per minute, per day, or per subscription plan. That “you’ve reached your limit” warning usually comes from this kind of limit.
So why do we hit these limits so quickly? The key is that LLMs are stateless: the model doesn’t remember previous conversations. For the model to “remember”, the application has to resend the conversation history with every request. The longer the conversation, the more input tokens get sent with each new message.
The same thing happens in the tool loop from steps 5 and 6. Every time a tool result is sent back to the model, it’s a new request carrying the entire previous context plus the tool result. That’s why an AI agent that calls lots of tools can burn through tokens much faster than a simple Q&A.
Calculating API costs
Let’s also figure out how to estimate token costs. Knowing the token count before sending a request lets us estimate the cost and make sure the prompt still fits within the context window. Providers usually offer a library or API for counting tokens, such as tiktoken[3] from OpenAI. Once we know the token count, we can calculate the cost with this general formula:
Cost = (number of tokens ÷ 1,000,000) × price per 1M tokensLet’s try it with the following simulated prices (not any specific provider’s pricing):
| Type | Tokens | Price / 1M tokens | Total Cost |
|---|---|---|---|
| Input | 4,000 | $1 | $0.004 |
| Output | 1,000 | $5 | $0.005 |
| Total | 5,000 | - | $0.009 |
Here’s the breakdown:
Input  = 4,000 ÷ 1,000,000 × $1 = $0.004
Output = 1,000 ÷ 1,000,000 × $5 = $0.005
Total  = $0.004 + $0.005 = $0.009
Notice that even though there are only a quarter as many output tokens as input tokens, the output costs more. That lines up with what we covered earlier: output is more expensive to generate.
The costs above are just an example. For actual pricing, check each provider’s pricing page.
Conclusion
Once we understand what tokens are, how a tokenizer turns plain text into tokens, why output costs more than input, and how costs are calculated, we get a much more complete picture of what’s happening behind the AI tools we use every day. Instead of just asking a question or handing off a task and calling it done, we can think about the impact of every prompt we send, from context length to the cost it incurs.
Everything above is my own learning notes. Mistakes in my explanations or understanding are entirely possible, so if you have anything to add or correct, let’s talk in the comments and learn from each other. Hope this helps 👋.